

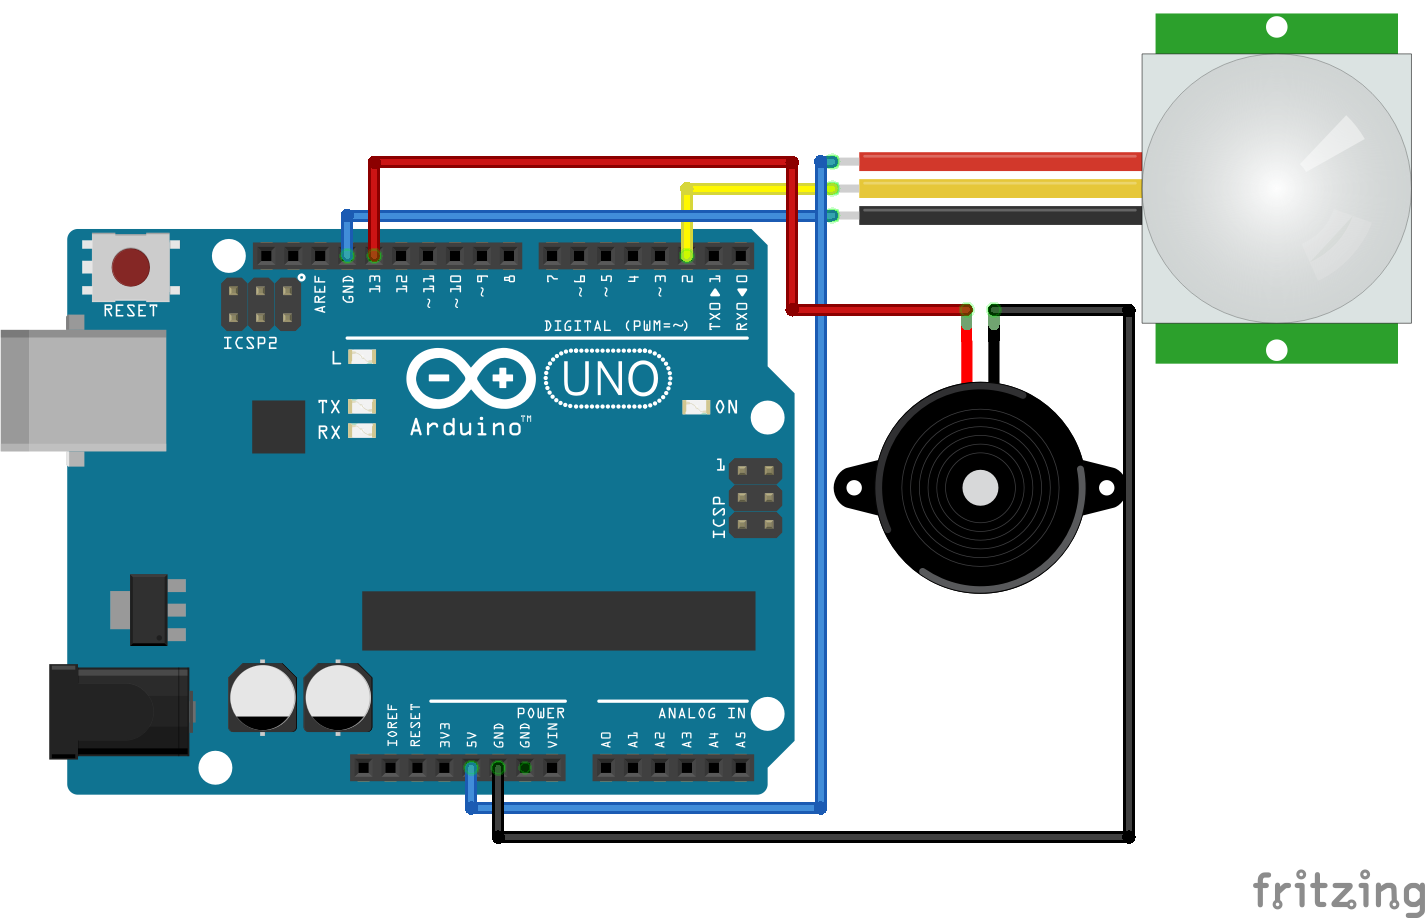
Explore a detailed circuit diagram for building a motion sensor alarm using Arduino. This comprehensive diagram showcases the connections between an Arduino board, a PIR motion sensor, and a buzzer.
Introduction:
In this tutorial, we will guide you through the process of creating a motion sensor alarm using an Arduino module. This project combines the Arduino board, a passive infrared (PIR) motion sensor, and a buzzer to detect motion and sound an alarm when movement is detected. Let's get started!
Required Components:
1. Arduino board (e.g., Arduino Uno)
2. PIR motion sensor
3. Buzzer
4. Breadboard
5. Jumper wires
6. 220Ω resistor
7. LED (optional)
8. USB cable for Arduino board
9. Computer with Arduino IDE installed
Circuit Diagram:
Step-by-Step Instructions:
Step 1: Connect the Arduino board
Connect your Arduino board to your computer using the USB cable. Ensure that the Arduino IDE is installed and open.
Step 2: Build the circuit
Follow the circuit diagram to connect the components on the breadboard as per the given instructions:
- Connect the VCC pin of the PIR motion sensor to the 5V pin on the Arduino.
- Connect the GND pin of the PIR motion sensor to the GND pin on the Arduino.
- Connect the OUT pin of the PIR motion sensor to digital pin 2 on the Arduino.
- Connect the positive leg of the buzzer to digital pin 3 on the Arduino.
- Connect the negative leg of the buzzer to GND on the Arduino.
- (Optional) Connect an LED to digital pin 4 on the Arduino with a 220Ω resistor in series. Connect the other leg of the LED to GND.
Step 3: Write the Arduino code
Open the Arduino IDE, create a new sketch, and enter the following code:
```arduino
int pirPin = 2; // PIR motion sensor pin
int buzzerPin = 3; // Buzzer pin
int ledPin = 4; // LED pin (optional)
void setup() {
pinMode(pirPin, INPUT);
pinMode(buzzerPin, OUTPUT);
pinMode(ledPin, OUTPUT); // (optional)
Serial.begin(9600);
}
void loop() {
int motion = digitalRead(pirPin);
if (motion == HIGH) {
digitalWrite(buzzerPin, HIGH);
digitalWrite(ledPin, HIGH); // (optional)
Serial.println("Motion Detected!");
delay(2000); // Alarm duration in milliseconds
digitalWrite(buzzerPin, LOW);
digitalWrite(ledPin, LOW); // (optional)
}
}
```
Step 4: Upload the code to Arduino
Connect your Arduino board to the computer, select the correct board and port in the Arduino IDE, and click the "Upload" button to upload the code to the Arduino board.
Step 5: Test the motion sensor alarm
After the code is successfully uploaded, disconnect the Arduino from the computer and power it using a USB charger or a battery pack. Place the motion sensor in a location where it can detect movement. When motion is detected, the buzzer will sound, and the LED (if connected) will light up.
Conclusion:
Congratulations! You have successfully created a motion sensor alarm using an Arduino module. This simple yet effective project demonstrates the power of Arduino and its ability to integrate with various sensors and components. Feel free to experiment further by adding features such as a delay function or integrating it with other devices for enhanced functionality. Have fun exploring the world of Arduino and its endless possibilities!
Support My Work with a Cup of Chai! ☕
If you are located in India, I kindly request your support through a small contribution.
Please note that the UPI payment method is only available within India.

UPI ID :
haneenthecreate@postbank
If you are not located in India, you can still show your appreciation by sending a thank you or an Amazon gift card to the following email address:
websitehaneen@gmail.com
Wishing you a wonderful day!
HaneentheCREATE is now available in the WhatsApp Become a member and join us