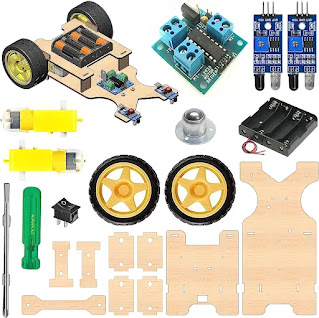
Discover how to build a simple line-following robot using Arduino with this step-by-step tutorial. Learn about motors, sensors, and programming as you assemble the robot chassis, connect the motor driver module and line sensor, upload code to Arduino, and power the robot. Follow along with images and a circuit diagram to visualize the process. Start your journey into robotics and explore the possibilities of autonomous line following. Perfect for beginners and those looking to gain hands-on experience in robotics and programming."
Introduction:
In this tutorial, we will guide you through the process of building a simple line-following robot using Arduino. This project is an excellent introduction to robotics and programming, allowing you to understand the basics of sensors, motors, and control systems. Let's get started!
Materials Required:
- Arduino Uno (or compatible board)
- Chassis with two motors
- Motor driver module (L293D or L298N)
- Infrared (IR) line sensor module
- Jumper wires
- Breadboard
- USB cable
- 4xAA battery pack
- Double-sided tape or adhesive
Step 1: Assemble the Robot Chassis
1. Start by attaching the motors to the chassis using screws or adhesive.
2. Place the motor driver module on the chassis and connect the motors to it using jumper wires. Refer to the module's datasheet or pinout diagram for proper connections.
3. Connect the motor driver module to the Arduino Uno: ENA to digital pin 9, IN1 to digital pin 8, IN2 to digital pin 7, IN3 to digital pin 6, IN4 to digital pin 5, and ENB to digital pin 3.
Step 2: Connect the Line Sensor
1. Connect the VCC and GND pins of the line sensor module to the 5V and GND pins of the Arduino, respectively.
2. Connect the OUT pin of the line sensor module to digital pin 2 of the Arduino.
Step 3: Upload the Code
1. Connect the Arduino to your computer using the USB cable.
2. Open the Arduino IDE (Integrated Development Environment) on your computer.
3. Copy and paste the following code into the Arduino IDE:
```
// Line-Following Robot
// Motor A
int motorA1 = 8;
int motorA2 = 7;
// Motor B
int motorB1 = 6;
int motorB2 = 5;
// Line Sensor
int lineSensor = 2;
void setup() {
pinMode(motorA1, OUTPUT);
pinMode(motorA2, OUTPUT);
pinMode(motorB1, OUTPUT);
pinMode(motorB2, OUTPUT);
pinMode(lineSensor, INPUT);
}
void loop() {
int lineState = digitalRead(lineSensor);
if (lineState == LOW) {
// Line detected, move forward
digitalWrite(motorA1, HIGH);
digitalWrite(motorA2, LOW);
digitalWrite(motorB1, HIGH);
digitalWrite(motorB2, LOW);
} else {
// No line detected, stop
digitalWrite(motorA1, LOW);
digitalWrite(motorA2, LOW);
digitalWrite(motorB1, LOW);
digitalWrite(motorB2, LOW);
}
}
```
4. Verify the code for any errors, then upload it to the Arduino.
Step 4: Power the Robot
1. Connect the 4xAA battery pack to the power input of the motor driver module.
2. Ensure the polarity of the batteries matches the module's requirements.
3. Make sure the Arduino is not connected to the computer during this step.
Step 5: Test the Robot
1. Place the robot on a flat surface with a contrasting-colored line.
2. Turn on the robot and observe its behavior.
3. The robot should follow the line autonomously, moving forward whenever it detects the line and stopping when it doesn't.
Congratulations! You have successfully built a simple line-following robot using Arduino. Feel free to experiment with different line colors, shapes, and layouts
to observe how the robot responds. You can also enhance the robot's functionality by adding additional sensors or integrating wireless communication.
Remember to always be curious and explore further possibilities in the field of robotics. Enjoy your new creation and happy tinkering!
Note: Safety precautions should be followed while working with electrical components.
The End
Buy Me a Chai ! ☕
If you're Not Indian 🥺 Please Send Me a Thanks or Amazon Gift Card to the E-mail
websitehaneen@gmail.com


